![icon outline.png]](https://support.nimblrsecurity.com/hs-fs/hubfs/icon%20outline.png?width=104&height=104&name=icon%20outline.png)
1. Set up your Organizations Settings & Adminstrators
Once your account is created, you will receive an email from Nimblr containing your login information.
First step is to provide some basic information about your organization.
1. Go to your Nimblr Organization at: https://nimblr.net/login
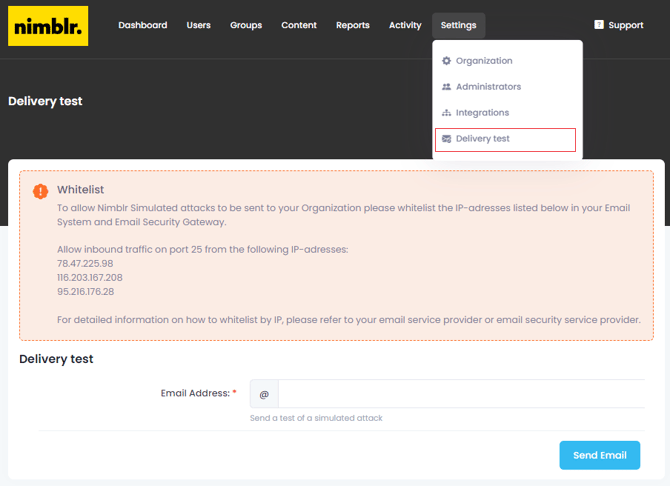
2. Navigate to the Settings section.

3. Going to the Administrators page you will see the option to Add new administrators to your portal.
There are several different role types for the admins:
|
Role name |
Access |
| Organizational Administrator | Full access to view and edit. |
| Organizational Administrator (read only) |
Access to view but not editing. |
| Group Auditor | Access to Automated Reports based on hierachy. |
4. On the Security tab you will be able to set up the login and general settings.

2. Configure the Whitelisting
To ensure that Nimblr's phishing simulations are not blocked by your organization's email filter, it's crucial to whitelist Nimblr's IP addresses.
This section provides essential whitelisting information necessary for the successful execution of Nimblr simulated attacks. While whitelisting is typically IP address-based, additional configuration may be required in some environments.
All Nimblr simulated attacks originate from the following IP addresses:
78.47.225.98
116.203.167.208
95.216.176.28
If you are using Antivirus, Spamfilter or other scanning tools outside of Microsoft:
If your organization uses external spamfilters, scanning tools or if messages are filtered so the domain's MX record does not point to Office 365, then this could lead to having clicks on simulations registered even when the user has not interacted with the email. Leading to the statistics and data being unreliable.
Please be sure to verify and configure in all systems that interact with the mail flow, inboxes or links being received by the organization.
If you'd like to add extra safety to get around this potential issue then you'll need to enable Enhanced Filtering for Connectors (also known as skip listing).
For more information, see Manage mail flow using a third-party cloud service with Exchange Online.
If you don't want Enhanced Filtering for Connectors, use mail flow rules (also known as transport rules) to bypass Microsoft filtering for messages that have already been evaluated by third-party filtering.
For more information, see Use mail flow rules to set the SCL to -1 in messages.
For whitelisting in any other tool you have you can use the same IP's, Domains & URL's as in the guide below.
For bypassing a spamfilter where you can't whitelist correctly, we can try sending directly to your organizations MX host.
To do this, please Submit a Ticket to our support team with your Exchange Host name included, see how here: Find your Exchange Hostname
Our Guides for Whitelisting Simulations:
Exchange Online:
This guide describes how to configure Microsoft Exchange Online to whitelist the Nimblr simulated attacks:
Whitelist Simulations in Exchange Online
Exchange On-Prem:
This guide describes how to configure Microsoft Exchange On-prem to whitelist the Nimblr simulated attacks:
Whitelist Simulations in Exchange On-Prem
Google Workspace:
This guide describes how to configure Google Workspace to whitelist the IP used to send simulated attacks:
Whitelist Simulations in Google Workspace
Spoofed senders:
You may also consider hiding the warning notifications in Microsoft Outlook clients to better simulate account take-over-attacks and similar by configuring the Tenant Allow list as described here:
Allow Spoofed Senders in Exchange Online
Courses:
Unlike the simulations, the course invitation emails should not need any whitelisting as they are perfectly legitimate emails, sent using correct authentication (SPF, DKIM, DMARC). However, in rare cases, some customers experience problems with course invitations ending up in junk or clutter folder.
In these cases we recommend taking a look at our guide:
Whitelist Course Invitations in Exchange Online
You may also contact our Nimblr Support team for any additional assistance with these steps.
Verify Whitelist configuration:
Send a test simulation to verify that your whitelist configurations are functional.
Login to your Nimblr portal on https://nimblr.net/login and navigate to
Settings > Delivery test then send a test simulation to a user by clicking Send Email.
3. Import & Sync your users automatically or manually
Add your users to the Nimblr portal automatically by setting up the Integration with Microsoft Entra or Google Workspace. Below you can find all the guides.
Automatic:
Setup integration with Microsoft Entra
Setup integration with Google Workspace
Setup integration with SFTP
Manual:
Add your users to the Nimblr portal manually by either adding users 1-by-1. Importing a CSV or text string.
Manual import & sync
4. Prepare the Users
Get the users ready for Nimblr Security Awareness Training
Before activating the users, we advise notifying users through an internal email.
This email should be sent from someone in a managerial position, ideally one or two days prior to activation.
We recommend providing details such as the sender's address/domain and content when sharing information about the forthcoming course invitation email. Ideally, include a screenshot of the invitation.
You can send a preview of the introduction course invitation email by navigating to Groups > Edit > Training Invitation > 'Send a preview of the invitation'
Find out more here:
Internal Communication Recommendations
5. Prepare the Groups
Before starting the service, it’s important to configure the group settings.
In the groups, you define location, language, ghost senders etc. It’s recommended to create one group per country (if you have offices in more than one country). Keep in mind to configure the default group before adding other groups as the default group works as a template.

Settings:
Training name will be visible in the email body of the training invitation.

Contact information:
Add your main phone number, info email address (or similar) and your web page. Add your headquarters address. This will be used as one of your spoofed internal senders as well as content in some simulations.

Group details:
Add your company logo as an email signature as we use this to make the simulations even more tailored to your organization.

Localization information:
Choose what language to use as default for the courses. If there 2 or more languages in that group, you may choose English as default and let the end users choose language by themselves.
Choose the country you’re based in as Simulation country. If you are based in Sweden, it would e.g. mean that you would get simulations about PostNord which perhaps wouldn’t be relevant if you are based in another country.
We will use the local language as well as English for the simulations.

Ghost senders:
In this section you add the persons you want to appear as spoofed senders. They will be used for different types of phishing simulations.

Technology:
In this section you give us information about what software or antivirus you’re using. We will use this data to create more tailored content. For instance, if you check "MS Office365" or "MS Office" as Office Suit and Toggle Report Phishing Emails, users will receive courses about Outlook's report button.

Training invitation:
Here you can customize the text for the course invitation. If you choose other language than English on the settings tab, make sure you translate the invitation text accordingly. You may send a preview to double check how it will look for the end user.

6. Prepare the Organization
The success of the safety awareness training hinges on its implementation.
Nimblr provides these recommendations to optimize organizational readiness:
Training Objectives & Consequences:
1. Clearly define the objectives of the training.
2. Address the repercussions of non-participation and unsatisfactory results.
3. Place an emphasis on risk management as the primary consequence driver, over and above simple non-compliance.
4. For enhanced clarity, these expectations and consequences should be documented in the organization's IT policies.
Managing User Reports:
Encourage Your Users to Use the Outlook Report Button.
As an IT administrator, promoting the use of the Report button in Outlook is a simple but effective way to strengthen your organization’s email security posture.
Why it matters:
When users report suspicious emails, it helps your security team detect and respond to threats faster — especially phishing attempts. It also contributes to Microsoft's threat intelligence, improving protection over time.
Encouraging your users to report rather than ignore suspicious emails fosters a proactive security culture.
Remember: Better safe than sorry.
Nimblr Simulations:
If you’ve configured whitelisting for Nimblr’s phishing simulations according to our documentation, reported simulation emails will appear clearly labeled as simulations in Microsoft’s Threat Explorer and other security reporting tools. This means your users can practice reporting, and you can track engagement — without confusion.
Key benefits:
-
Empowers users to actively participate in phishing defense
-
Improves incident response visibility
-
Enhances Microsoft Defender’s detection through user feedback
-
Seamlessly integrates with Nimblr’s training simulations
Learn more:
🔗 Use the Report Message add-in – Microsoft Docs
What to do next:
-
Deploy the Report Message or Report Phishing add-in organization-wide
-
Remind users to report anything suspicious — real or simulated
-
Reassure users that false alarms are OK, and reporting simulations is encouraged
