![icon outline.png]](https://support.nimblrsecurity.com/hs-fs/hubfs/icon%20outline.png?width=104&height=104&name=icon%20outline.png)
When synchronization with Microsoft Entra ID has been enabled, you can no longer manually add or remove users in the Nimblr portal. Users previously added to the portal will be deleted if they cannot be matched with Microsoft Entra ID users.
Note that your Mircosoft Entra might look different, based on your settings and license you have in your organization. Our integrations do not require E5/P2 license.
1. Log into the Azure portal at https://portal.azure.com/. Search for and select Microsoft Entra ID.

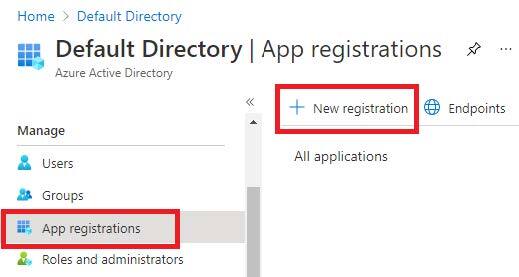
2. In the left menu, under Manage, select App registrations and click New registration.
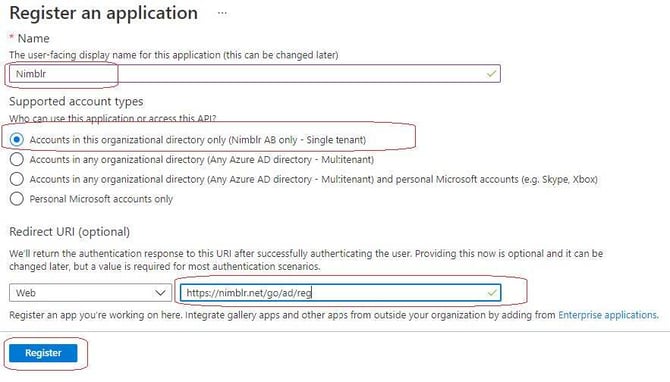
3. Enter a name, for example. ‘Nimblr’.
4. Select Accounts in this organizational directory only
5. In the “Redirect URI” section - select Web and enter the following URL: https://nimblr.net/go/ad/reg and click Register.
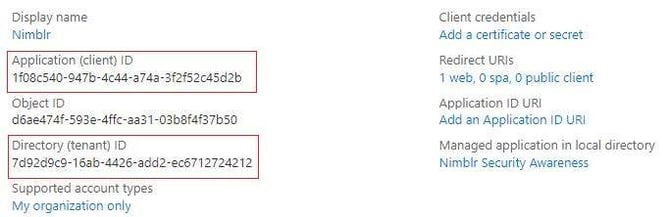
6. Three values are now showing. Copy and save the Application (client) ID and the Directory (tenant) ID details into a notepad or other document for use in a later step.
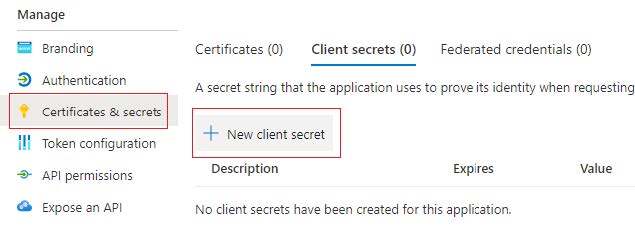
7. Select Certificates & secrets on the left hand side and click New client secret.
8. Enter a description, for example ‘Nimblr Secret’ and set the Expire time to 24 months or more. Click Add.
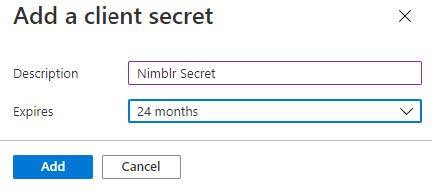
9. Copy and save the Value (Client Secret) into a notepad or other document for use in a later step.
Make sure you save the Value as it’s only shown once and later will be replaced by “****” in the Azure portal.

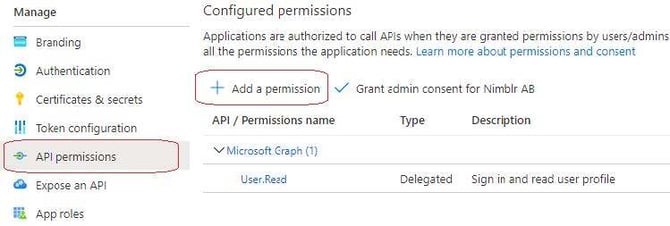
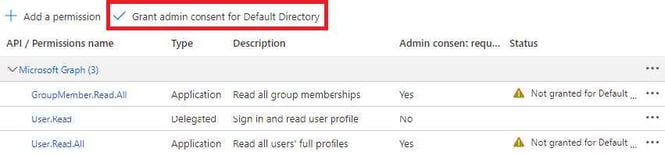
10. Click API Permissions on the left hand side. The permission User.Read should already be listed. Click Add a permission.
11. Click Microsoft Graph
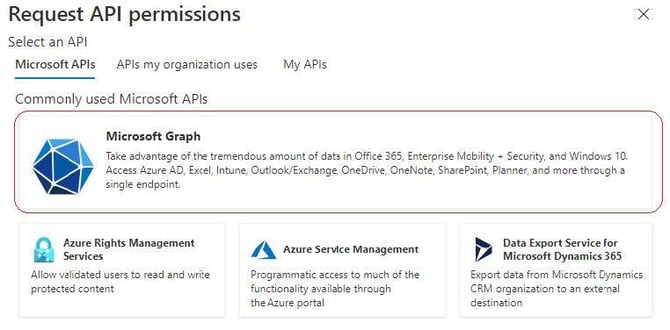
Choose Application Permissions on the next screen.

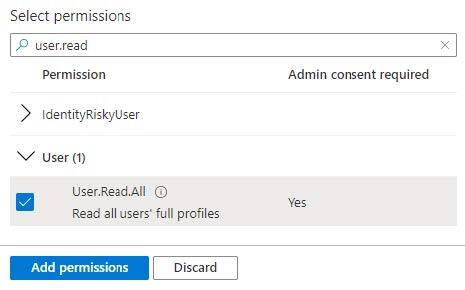
12. Search for and select the following permissions: (you may select both permissions at once, before continuing.)
-
User.Read.All
-
GroupMember.Read.All
Then click Add permissions.
13. A list of the selected permissions should now show. Click Grant admin consent for… and select Yes when prompted.
Consider creating a new Azure Group of users to be used in the Directory integration configuration. Nested groups are at the time not supported by the Microsoft API, only direct-members will be synced.
14. Login to your Nimblr account at https://nimblr.net and navigate to the Integrations section under the Settings menu and select Integration type Microsoft Entra ID.
![]()

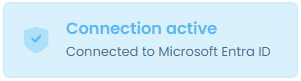
15. Paste the values saved in previous steps (Application ID, Client Secret and the Directory ID Value).Click Save Changes and a confirmation like below should show.
16. Choose the user Activation you wish to use. This can be changed at any time.
Activate new users manually - This option will set status “Pending” to any new user(s) that is added from the external directory synchronization. An administrator will have to manually activate the users for the training program to start.
Activate new users automatically - This option will automatically activate any new user(s) that is added from the external directory synchronization and immediately start sending training invitations and/or simulations to the user(s).

17. You’re now asked to select the preferred Group membership method.
Linked - Enables you to assign one or more external directory groups to Nimblr groups. This option is often used in multi-language enterprises with employees in different countries to automatically give them membership in a Nimblr group that has a specific language configured.
The assigning of groups are made in the Groups > Integration settings after the Integration settings have been completed.
Manually - Will synchronize all new users in the selected Azure groups to the Nimblr default group and allows for users to be manually moved into different Nimblr Groups.
18. Select what Groups to be synchronized. This option is only available if Group Membership is set to Manually. Add the external directory group(s) that should be synchronized and assigned to the Nimblr Default Group.
You may still create additional Nimblr Groups and manually assign users to different Nimblr Groups. To use this option you must manually specify the name of the Azure Group to synchronize in the Nimblr configuration window.
19. Select the 'Auto-Create Group Auditors' option to automatically create group auditors with limited, read-only access to reporting and statistics. The scope of these auditors is determined by the users' 'Manager attribute'.
By default, auto-created group auditors will receive a monthly summary report via email, covering their assigned user scope.
20. Click Save Changes.
Assigning Groups:
Only for use with the Linked Group Membership option.
After completing the Directory Integration configuration, Azure groups can be assigned to a Nimblr group.
Before assigning external directory groups to Nimblr groups, you may want to create additional Nimblr groups. This can be done from the Groups menu by clicking Add New Group.
The settings of the new groups will be inherited from the 'default group' but can be independently modified or updated.
To assign users from specific external directory groups to a Nimblr group, navigate to the group you wish to associate with, click Edit, then go to the Integration tab.
Add one or more external directory groups and click Save Changes.
Managing AD Groups in Nimblr:
When integrating Active Directory (AD) with Nimblr, it's essential to carefully manage the AD groups you assign to ensure proper license usage and user control.
License Consumption Warning:
Any user included in an AD group that is assigned to Nimblr will automatically consume a Nimblr license, regardless of their status in your Active Directory.
Important Details:
-
All users in assigned AD groups count toward license usage.
-
Paused, disabled, or inactive users in AD are not recognized as such by Nimblr.
-
Nimblr treats all users in the AD group as active.
This means that even if you pause or disable a user in AD, they will still be counted as an active user in Nimblr and will use a license.
Recommended Best Practice:
To maintain control and avoid unnecessary license usage:
-
Create Nimblr-exclusive AD groups that include only users who should actively use Nimblr.
-
Regularly audit the members of these AD groups to ensure they reflect only valid, intended users.
-
Avoid assigning general or broad AD groups (e.g., "All Employees") unless every user in that group should have access to Nimblr.