![icon outline.png]](https://support.nimblrsecurity.com/hs-fs/hubfs/icon%20outline.png?width=104&height=104&name=icon%20outline.png)
This guide describes how to whitelist Nimblr's simulated attacks in Google Workspace / Gmail. Please refer to the following link for further details: https://support.google.com/a/answer/60751?hl=en
Part 1 - Add Nimblr's IP addresses to Email Whitelist
1. Login to https://admin.google.com and click Apps > Google Workspace > Gmail. Scroll down and click Spam, Phishing and Malware.

2. Click the pen in the Email allowlist box to edit the allowlist.
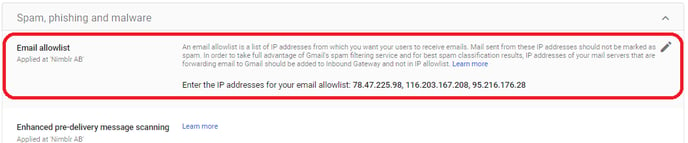
3. Add Nimblr’s IP numbers listed below to the list. Separate the entries with commas.
78.47.225.98, 116.203.167.208, 95.216.176.28 and click SAVE.

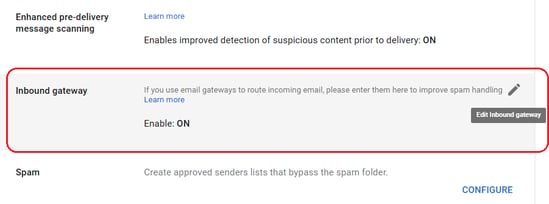
Part 2 - Add Nimblr's IP addresses to Inbound Gateways
This method of whitelisting is to prevent the Google warning banners from appearing in your user's inbox when they receive a simulated attack from Nimblr. We have found that this process disables most warnings when receiving Nimblr simulated attacks. However, this is not documented by Google as a whitelisting feature.
1. Login to https://admin.google.com and click Apps > Google Workspace > Gmail. Scroll down and click Spam, Phishing and Malware.
2. Scroll down to the Inbound Gateway and click the pen to edit the gateway settings.
3. Make sure the Enable box is checked and then click Add to enter the Nimblr’s IP’s 78.47.225.98, 116.203.167.208 and 95.216.176.28 one at the time.
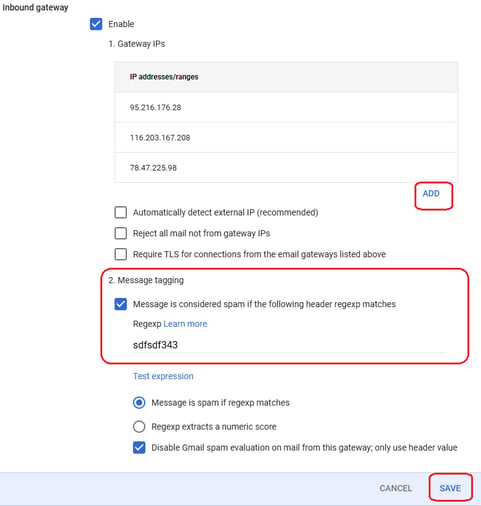
4. Leave the first three boxes unchecked. Check the box for “Message is considered spam if the following header regexp matches” and enter a phrase that is unlikely to appear in an email header. For example sdfsdf343. Choose “Message is spam if regexp matches” and check the box for “Disable Gmail spam evaluation on mail from this gateway; only use header value”
5. Click Save.
Verify Whitelist configuration
Send a test simulation to verify that your whitelist configurations are functional. Login to your Nimblr portal on https://nimblr.net and navigate to Settings > Delivery test. Send a test simulation to a by clicking Send Email.
